Proxy
Table of contents
- Install MongoDB
- Install Datahouse
- Install Postgres
- Install EVSClient (Optional)
- Install EVS Gateway (Optional)
- Install Gazelle User Interface
- Install Gazelle Admin Interface
- Install Proxy
Introduction
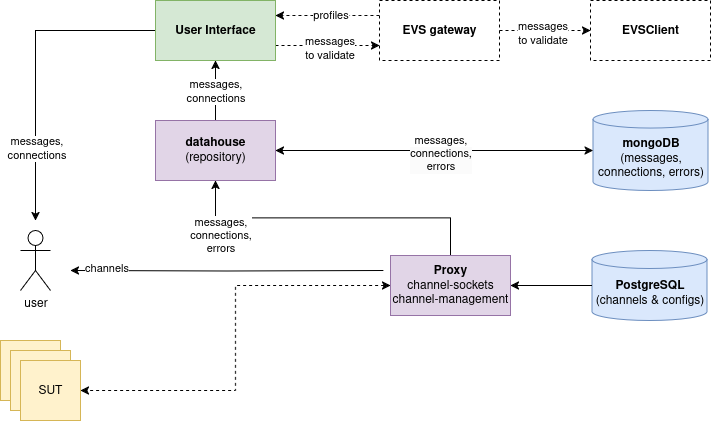
This document provides a step-by-step guide to install the Gazelle Proxy Stack. The Gazelle Proxy Stack is a set of services that provide a proxy server with traffic capture capabilities. The stack consists of the following services that need to be installed in the following order:
- MongoDB: A NoSQL database used to store the data.
- Datahouse: A service that provides an API to store and retrieve data from MongoDB.
- Postgres: A relational database used by
EVSClient. - EVSClient: A service to validate documents using external validation services.
- EVS Gateway: A gateway that provides
Datahousewith the ability to validate documents with EVS APIs. - Gazelle User Interface: A web application (Next.js) with a component to visualize captured messages.
- Gazelle Admin Interface: A web application (Next.js) with a component to manage channels.
- Proxy: A service that provides the channel management and traffic capture capabilities.
Prerequisites
- Docker
- Docker Compose
Install MongoDB
MongoDB is a NoSQL database used by Datahouse service to persist incoming items.
How to install
A docker image is available for MongoDB at Gazelle MongoDB.
No configuration is needed for the Proxy use-case. for more details, please refer image documentation.
docker-compose up -d
Test the installation
To test the installation, you can use the following command to connect to the MongoDB instance:
docker exec -it mongodb mongosh "mongodb://gazelle:gazelle@localhost:27017/"
Migrations are automatically handled by the datahouse service (with Mongock), no need to run them manually.
If you can connect to the MongoDB instance, the installation is successful.
Troubleshooting
Could not init database
If you are facing the following error: Could not init database.
['/usr/bin/mongod', '--bind_ip', '127.0.0.1', '--port', '27017', '--logappend', '--tlsMode', 'disabled', '--logpath', '/proc/1/fd/1', '--fork']
Subprocess failed with errorcode -4 when starting the MongoDB container, in 90% of the cases,
this is due to the fact that MongoDB requires a CPU with AVX support.
If you are installing MongoDB on a server’s virtual machine, try to change the VM’s CPU configuration to support AVX
(For example, proxmox has an option to enable AVX support in the CPU configuration).
Install Datahouse
Datahouse is a service that provides an API to store and retrieve data from MongoDB.
How to install
Datahouse requires an indexes configuration file to be mounted as a volume.
The configuration file should be named index_configs.json and should be placed in the /opt/datahouse directory
To be mounted automatically.
A docker image is available for Datahouse at Gazelle Datahouse.
An example for the proxy use-case of the index_configs.json file is available in the datahouse docker image repository.
Just copy the file to the /opt/datahouse directory and rename it to index_configs.json.
Datahouse requires a presentation schema file to be mounted as a volume.
The configuration file should be named presentationSchema.json and should be placed in the /opt/gazelle-user-interface/message-capture directory
An example for the proxy use-case of the presentationSchema.json file is available in the datahouse docker image repository.
If using the MongoDB image provided in the previous step, there is no configuration needed for the Proxy use-case.
The Datahouse stack is not ready yet to run as we need to install the
Datahouse UIthat requires configurations from theEVS Gateway. Please refer to theInstall Datahouse UIsection.
For Dev mode use .env.dev file to configure the environment variables, and for production use the .env file.
If using another MongoDB instance, you need to configure the following environment variables in the .env/.env.dev file:
MONGODB_HOST: The host of the MongoDB instance. (default:localhost)MONGODB_PORT: The port of the MongoDB instance. (default:27017)MONGODB_DATABASE: The name of the MongoDB database. (default:datahouse)MONGODB_USERNAME: The username of the MongoDB instance. (default:gazelle)MONGODB_PASSWORD: The password of the MongoDB instance. (default:gazelle)
The service is available on port 8082. If you want to change the port,
you can do it by changing the QUARKUS_HTTP_PORT environment variable in the .env/.env.dev file.
To run the service in dev mode, you can use the following command:
docker-compose --env-file .env.dev up -d
How to update
When updating the Datahouse service, if there are changes in the index_configs.json file, you need to restart the service to apply the changes.
A script is provided in the datahouse docker image to update the indexes without losing data. indexes_migration_2.1.0.sh
ALERT: today we are not separating indexes based on the usecase, this will be done in the future versions.
Test the installation
Check the service
To check if the service is running, you can use the following command:
curl http://localhost:8082/datahouse/rest/v1/indexes
If the service is running, you should see the list of indexes provided in the index_configs.json file.
Check the MongoDB
To check if datahouse has correctly created indexes, navigate to the datahouse database and list the collections:
use datahouse
show collections
You should see at least the following collections:
indexes_config
If you see the collection, then the installation is successful.
Troubleshooting
Could not start the service
If the service does not start, it could be due to the different types of issues:
- The MongoDB instance is not running
- The MongoDB instance is not accessible from the
Datahouseservice - The
index_configs.jsonfile is not mounted correctly - The
index_configs.jsonfile is empty or has an invalid format - A previous version of the indexes update script has a typo in the file name
indexes_config.jsoninstead ofindex_configs.json. Make sure to rename the file if you are using an old version of the script.
MongoDB enables by default an index validation that ensures that all searchable are indexed.
This validation can be disabled by setting the DATAHOUSE_INDEX_VERIFICATION environment variable to true in the .env/.env.dev file.
Install Postgres
Alternative
If you have a manual installation of Postgres, you can skip the installation of the Postgres service and use the existing instance.
How to install
To install postgres, please refer to the gazelle-database project.
This instance is used by EVSClient and Proxy to store the data.
Test the installation
To test the installation, you can use the following command to connect to the Postgres instance:
docker exec -it gazelle-database psql -U gazelle -d postgres
If you can connect to the Postgres instance, the installation is successful.
Install EVSClient
OPTIONAL
If you can’t an already running instance of EVSClient, you can install it using the gazelle-evs-client project.
You will need to have at least one validation profile to be able to run validation requests from proxy later.
See JBOSS_PORTS_OFFSET environment variable in the .env file to change the port of the service.
Test the installation
To test the installation, you can open the following URL in your browser:
http://localhost:8585/evs
or if in production mode:
https://${FQDN}/evs
And try to validate a document using the configured service.
Install EVS Gateway
OPTIONAL
Only required if EVSClient is installed, and we need to validate messages from proxy (datahouse-ui).
EVS Gateway is a service that provides Datahouse with the ability to validate documents with EVS APIs.
How to install
A docker image is available for EVS Gateway at Gazelle EVS Gateway.
For Dev mode use .env.dev file to configure the environment variables, and for production use the .env file.
You will need to configure the following environment variables in the .env/.env.dev file:
QUARKUS_DATAHOUSE_SERVICE_URL: The URL of the datahouse service. (default:http://localhost:8082)EVS_SERVICE_REST_URL: The URL of the EVS service. (${baseURL}/evs/rest/validations)EVS_SERVICE_URL: The URL of the EVS service. (${baseURL}/evs)
The service is available on port 8083. If you want to change the port,
you can do it by changing the QUARKUS_HTTP_PORT environment variable in the .env/.env.dev file.
To run the service in dev mode, you can use the following command:
docker-compose --env-file .env.dev up -d
Test the installation
To test the installation, you can run the following command to check if the service is running:
curl http://localhost:8083/evsgateway/rest/v1/validationProfiles
or if in production mode:
curl https://${FQDN}/evsgateway/rest/v1/validationProfiles
If the service is running, you should see the list of validation profiles.
Install Gazelle User Interface
(Previously named Datahouse UI)
Gazelle User Interface is a web application (Next.js) in the form of a monorepo that provides many UIs, where we are interested in the “message-capture” UI.
This component provides a user interface to visualize captured messages from Proxy service stored in Datahouse.
How to install
The docker image with the compose file is available in Gazelle User Interface.
After completing the configuration of Gazelle User Interface, we can run the Datahouse stack.
You will need to configure the following environment variables in the .env file:
GZL_DTH_API_URL: The URL of the datahouse service. (default:http://localhost:8082/datahouse/rest/v1)GZL_DTH_EVSGATEWAY_URL: The URL of the EVS Gateway service. Used to load profiles & validate messages (default:http://localhost:8083/evsgateway/rest/v1)GZL_DTH_VALIDATION_ENABLED: Enable/Disable the validation feature. (default:true)NEXT_PUBLIC_BASE_URL: The base URL of the application. (default:http://localhost:3000/gazelle)
The service is available on port 3000. If you want to change the port,
you can do it by changing the PORT environment variable in the .env file.
You can run both services Datahouse and Gazelle User Interface in dev mode using the following command:
docker-compose --env-file .env.dev up -d
Test the installation
To test the installation, you can open the following URL in your browser:
http://localhost:3002/gazelle/home
or if in production mode:
https://${FQDN}/gazelle/home
Troubleshooting
UI is not working on localhost
If for some reason the UI is not working on localhost, you can change the binding host in the .env file
using the HOSTNAME environment variable.
No data is displayed
Make sure that the Datahouse service is running and that the Gazelle User Interface service is configured to point
to the correct URL of the Datahouse service. (QUARKUS_DATAHOUSE_SERVICE_URL)
Install Gazelle Admin Interface
Gazelle Admin Interface is a web application in the form of a monorepo (Next.js) that provides admin users interface to manage the Gazelle applications.
In our use-case, we are interested in the “channel-management” UI.
This component provides a user interface to manage channels using the Proxy service.
How to install
The docker image with the compose file is available in Gazelle Admin Interface.
After completing the configuration of Gazelle Admin Interface, we can run the Proxy stack.
You will need to configure the following environment variables in the .env file:
CHANNEL_API_URL: The URL of the proxy service. (default:http://localhost:8595/proxy/rest/v1)
Install Proxy
Proxy is a service that provides a proxy server with traffic capture capabilities and channel management.
How to install
The docker image with the compose file is available in Proxy
You will need to configure the following environment variables in the .env/.env.dev file:
DATAHOUSE_URL: The URL of the datahouse service. (default:http://localhost:8082/datahouse/rest/v1)PROXY_SERVICE_IP_ADDRESS: The IP address of the proxy service. (default is the FQDN)PROXY_SUBPIPELINE_READ_TIMEOUT_SECONDS: The read timeout of the subpipeline. (default:10)HANDLER_LOGGER_ENABLED: Enable/Disable the handler logger. This logger logs all incoming/outgoing messages through proxy (default:true)
The service is available on port 7999. If you want to change the port,
you can do it by changing the QUARKUS_HTTP_PORT environment variable in the .env/.env.dev file.
As the new version of Proxy assigns ports dynamically to channels based on the available ports in the system, you need to configure the range of ports that can be used by the channels.
CHANNEL_MANAGER_PORT_RANGE_MIN=10000
CHANNEL_MANAGER_PORT_RANGE_MAX=11000
Database configuration is set to default values that are compatible with the gazelle-database image provided in the previous step.
CHANNEL_MANAGER_DATABASE_NAME=channel-manager
CHANNEL_MANAGER_DATABASE_PORT=5432
CHANNEL_MANAGER_DATABASE_HOST=localhost
CHANNEL_MANAGER_DATABASE_USER=gazelle
CHANNEL_MANAGER_DATABASE_PASSWORD=gazelle
Test the installation
Check the service
To check if the service is running, you can use the following command:
curl http://localhost:7999/proxy/rest/v1/metadata
If the service is running, you should see the metadata of the service.
Troubleshooting
Could not record in Datahouse
If the service is not recording in the Datahouse service, it could be due to the different types of issues:
- The
Datahouseservice is not running - The
Datahouseservice is not accessible from theProxyservice - The
Datahouseservice is not configured correctly in the.env/.env.devfile with the variableDATAHOUSE_URL
Turn the logs (if not already) with QUARKUS_LOG_LEVEL to INFO mode to see more details about the recording endpoint.
TLS configuration
To use TLS capabilities, you need to configure the following environment variables in the .env/.env.dev file:
TLS_DEFAULT_KEYSTORE_PATH=”/opt/gazelle/cert/jks/keystore.jks”TLS_DEFAULT_KEYSTORE_PASSWORD=”password”TLS_DEFAULT_TRUSTSTORE_PATH=”/opt/gazelle/cert/jks/truststore.jks”TLS_DEFAULT_TRUSTSTORE_PASSWORD=”password”TLS_IMPORT_JAVA_STORE=”true”
The Gazelle Admin Interface also provides an interfaces to upload certificates to be used by the proxy service.
ALERT: The JKS configs are only loaded once at the first proxy startup, if you change the keystore/truststore files, you need to delete the proxy database to force re-initialization of the keystore/truststore. Otherwise we recommend updating the keystore/truststore configuration directly from the
Gazelle Admin Interface.
You can generate the keystore and truststore files with keytool (from jdk) following these steps:
- Generate a keystore file:
keytool -genkey -keyalg RSA -alias selfsigned -keystore jboss.jks -storepass password -validity 360 -keysize 2048 -storetype JKS
- Bring a certificate to trust (apache, etc.)
[Optional]
2.1. Export the certificate:
keytool -exportcert -alias selfsigned -keystore jboss.jks -file selfsigned_cert.cer -rfc -storepass password
- Add the certificate to the truststore:
keytool -import -alias selfsigned -file certificate.crt -keystore truststore.jks -storepass password -storetype JKS
Authentication
If you are in dev mode, and you don’t have keycloak running, you can disable authentication and run on ip_login mode, change the .env.dev file:
cas_enabled: “false”ip_login: “true”ip_login_admin: “.*”
In a production environment, you should have a keycloak running and configure the keycloak environment variables:
GZL_SSO_ADMIN_USER: The admin user of the keycloak realm. (default:gazelle-clients-admin)GZL_SSO_ADMIN_PASSWORD: The admin password of the keycloak realm. (default:admin)GZL_SSO_URL: The URL of the keycloak realm. (default:https://${FQDN}/auth)CAS_SERVER_URL_PREFIX: The URL of the CAS server. (default:https://${FQDN}/auth/realms/gazelle/protocol/cas)CAS_SERVER_LOGIN_URL: The URL of the CAS server login. (default:https://${FQDN}/auth/realms/gazelle/protocol/cas/login)CAS_SERVER_LOGOUT_URL: The URL of the CAS server logout. (default:https://${FQDN}/auth/realms/gazelle/protocol/cas/logout)SERVER_NAME: The name of the server. (default:https://${FQDN}/)
End-to-End test
Open the following URL in your browser:
http://localhost:3001/gazelle/admin/channels # Gazelle Admin Interface URL
If not accessible, refer to the troubleshooting section (cannot access the service).
Log in and create a new channel of type HTTP without enabling HTTP Rewrite nor TLS.
Set the responder gazelle.ihe.net and the port 80 and channel port to 10500.
If the channel been created, please continue.
If you cannot log in, refer to the troubleshooting section (cannot log in). If you cannot create a channel, refer to the troubleshooting section (cannot create a channel).
If you are on localhost, ${HOST} should be localhost, if you are on a server, ${HOST} should be the server’s domain name.
Use the following command to test the channel:
curl -X GET http://${HOST}:10500
If you got a response from the responder, the proxy forward the request correctly, please continue.
If you have no response, refer to the troubleshooting section (cannot forward the request).
Check if at least two messages were added to Gazelle User Interface under the “message capture” section,
one for the request and one for the response.
If you can see the messages, with no decoding issues, the installation is successful.
If no messages were added, refer to the troubleshooting section (cannot record in datahouse).
Troubleshooting
Can not login
If you cannot login, and using keycloak, please refer to GUM project Gazelle User Management to install the keycloak instance.
Cannot create a channel
If you cannot create a channel, it could be due to the different types of issues:
- Proxy is not running or not accessible from Gazelle Admin Interface
- The property
CHANNEL_API_URLis not configured correctly in the.env/.env.devfile of gazelle-admin-interface - No available ports in the configured range
Cannot forward the request
If you cannot forward the request, it could be due to the different types of issues:
- Proxy is not running or not accessible from the channel
- The machine where Proxy is running could block the incoming request
- The channel was closed suddenly for an unknown reason
For any other issues, please contact the Gazelle team.